
 Since I killed every herb that I planted last year, I thought I would take a chance again and start some in these little eggshells indoors. I think one of the greatest things about this whole project is how cheap it was to pull off. Since you already know my history with plants, I thought I would see if the dollar store had any seeds that I could experiment with first. They sure did. I picked up some dill, cilantro, chives, parsley, and for a little excitement, a mystery seed packet. Lucky for me, they were also selling a small bag of potting soil. I splurged on the eggs, believe it or not, and went for a dozen with multi-colored shells that are all from free-range chickens. They were at our local farmer's market. I think they were about $3. So, in total, this whole "craft" set me back about 6 bucks.
 So I spent a little bit of time cutting off the top of each eggshell and dumping the gooey eggs into a container-they were perfect for scrambled eggs the next day! The eggs cut pretty well, for the most part. Using a sharp blade worked best, but sometimes the shells broke a little too much. After a few instances involving curse words, I discovered that snipping along the top edge with scissors helped to neaten up the top of the shell. Then I rinsed them out and tried to scrape out the membrane stuff from the inside of the shell.
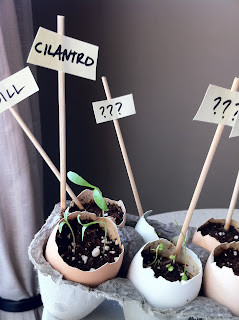
 I turned them upside down to dry on a paper towel. While they dried, I made the little signs for each eggshell. I just wrote down the herb names on cardstock paper, snipped them out, and taped them to wooden skewers.
When the shells dried, they each received about a teaspoonful of soil, then some seeds, then a teeny bit more soil for the top. I have been using a spray bottle to water them each day. They're pretty cute, right?

After about a week and a half of worrying that I killed the seeds again and that I would have no craft to share, I found my "green" color! It looks like most of the mystery seeds have come up, and I have some healthy-looking cilantro. I can taste the fresh salsa now.
So I'm thinking that I will transplant them into bigger pots when they grow a bit more. Do you guys think I could just break the shells up and throw the pieces into the pots too? Maybe I'll try it. We'll see if they make it through the summer!
So I'm thinking that I will transplant them into bigger pots when they grow a bit more. Do you guys think I could just break the shells up and throw the pieces into the pots too? Maybe I'll try it. We'll see if they make it through the summer!
thats so cute! great idea. you planting them outside in the spring?
ReplyDeleteellen, those are BEYOND cute!! I'd like to try that at home, I bet the boys would LOVE it!
ReplyDeleteIt looks like you've got a "green" thumb after all (I couldn't resist).
ReplyDeleteI love the little signs you made showing what each egg holds and am very excited to see what your mystery seeds are. :)
These are really cute! Totally could just break the shells...Egg Shells go in compost piles... I love the dollar store mystery seeds!
ReplyDeleteVery fun! I love "???". Everyone needs some surprises in life.
ReplyDeleteThis is so stinkin' cute, but made better b/c your plants are actually growing!
ReplyDelete