Wednesday, March 30, 2011

Green 3x


I decorated a green wine bottle with wire and beads. I ordered a Water Nanny Stake through Amazon to attach to the top of the bottle. You put the bottle filled with H2O with the Nanny attached into a plant and you don't have to worry about watering the plant everyday. I am a serial plant killer. I used a recycled product, the bottle is green, and it is for a green (hopefully not brown) plant. It was fun and super easy. I should have done it right after I drank the wine then it would have been even more fun!

Tuesday, March 29, 2011

Green, New, and a Moneymaker!

My March project was a crib set test--fitted sheet, bumper, and skirt. A (online--gasp!) friend asked if I'd be able to make her new little one a crib set, and I had to test it before I could think about selling her anything, plus now I have a sample! ANYWAY, this fits the criteria because part of it is green (the fitted sheet), it was a new project for me, AND I am making some cool, crisp, green cash off of it! I have not one but TWO orders for crib sets!!!! I got the patterns from Amy Butler's Little Stitches for Little Ones book. It was my first time using a strictly worded pattern--no online tutorial with a million pictures...The book was great for the bumper and the skirt, but I did find an easier pattern for the sheet online that kept the fabric in one large piece instead of 4-5 smaller pieces...All in all, the whole set was relatively easy to make (minus the cutting pieces bigger than my mat--ugh!). I did (of course) stay up WAY past my bedtime last night finishing the skirt and the last panel I attached is backwards. Thankfully our crib (and most) is against a wall so nobody can see THAT snafu!

Friday, March 25, 2011

St. Pat's Door Hanging

Okay, I crocheted this cute St. Patrick's Day door hanging and it turned out better than I thought it would! I just taught myself to crochet last summer and I am proud of my progress!

Thursday, March 24, 2011

My Greenish Gift

So I had a busy month, I just took a trip back to Buffalo for my very good friends wedding shower. I also decided to make her a quilt sometime in February which was not really enough time seeing as though I had to special order fabric and wait for it and then I put off starting it until my other girlfriend came for a visit and we sewed together. We got all the cutting and small piecing together which is probably how I actually was able to get this done in a two week period! My marriage suffered and my hubs said "NO MORE QUILTS!" (He's just kidding....sort of) and I may have neglected Vivy for a couple days but she likes Sesame Street SO much anyway. When i saw my girlfriends face at her shower, it was worth it! This was a nightmare but that's a long story I won't go in to it, but probably one of the nicest ones i have made.

I learned a couple things:

1. There is some AWESOME fabric for sale on Etsy and I am not sure I will ever primarily shop at Joanne's ever again.

2. Two people piecing the same quilt on two different sewing m
achines is not always the best idea.

3. The awesome free motion quilting machine I used from a friend of mine cost as much as my car therefor I will go back to my little Bernett and try to refrain from swearing.

So I know this might not fit in with the theme but I want to brag a bit to people who understand and I have absolutely no other time and honestly crafted-out for a week or so...


Monday, March 21, 2011

Green x2

So in my first-ever craftastic mission, I wanted to go the extra mile and try to be "green" as in "eco-friendly" and do something with "green" the color at the same time. I am sure some of you have seen these little eggshell planters before and some of you probably made them in grade school. In a quick Google search, I found that most people draw kooky little faces on the eggshells and then plant grass seed in them so that when it grows it looks like they have crazy hair. They are pretty cute and definitely kid-friendly. It is also a fun way to recycle the eggshells, which usually are thrown out in the trash-unless you compost, but then you're already wonderful and environmentally-friendly if you do all of that. Since I killed every herb that I planted last year, I thought I would take a chance again and start some in these little eggshells indoors. I think one of the greatest things about this whole project is how cheap it was to pull off. Since you already know my history with plants, I thought I would see if the dollar store had any seeds that I could experiment with first. They sure did. I picked up some dill, cilantro, chives, parsley, and for a little excitement, a mystery seed packet. Lucky for me, they were also selling a small bag of potting soil. I splurged on the eggs, believe it or not, and went for a dozen with multi-colored shells that are all from free-range chickens. They were at our local farmer's market. I think they were about $3. So, in total, this whole "craft" set me back about 6 bucks.
So I spent a little bit of time cutting off the top of each eggshell and dumping the gooey eggs into a container-they were perfect for scrambled eggs the next day! The eggs cut pretty well, for the most part. Using a sharp blade worked best, but sometimes the shells broke a little too much. After a few instances involving curse words, I discovered that snipping along the top edge with scissors helped to neaten up the top of the shell. Then I rinsed them out and tried to scrape out the membrane stuff from the inside of the shell.

I turned them upside down to dry on a paper towel. While they dried, I made the little signs for each eggshell. I just wrote down the herb names on cardstock paper, snipped them out, and taped them to wooden skewers.


When the shells dried, they each received about a teaspoonful of soil, then some seeds, then a teeny bit more soil for the top. I have been using a spray bottle to water them each day. They're pretty cute, right?


After about a week and a half of worrying that I killed the seeds again and that I would have no craft to share, I found my "green" color! It looks like most of the mystery seeds have come up, and I have some healthy-looking cilantro. I can taste the fresh salsa now.


So I'm thinking that I will transplant them into bigger pots when they grow a bit more. Do you guys think I could just break the shells up and throw the pieces into the pots too? Maybe I'll try it. We'll see if they make it through the summer!

Sunday, March 13, 2011

Going Green

I have wanted to try freezer paper stenciling for a while now and finally got around to it last night. There are a lot of different tutorials available on the internet. I read through a bunch prior to starting and took bits and pieces from several them.

The main thing you need is freezer paper - this is not the same as press and seal (which I accidentally bought first) or wax paper. I found this roll at my grocery store. You also need paint. It seems like a lot of the tutorials recommend fabric paint. I used regular acrylic craft paint and it worked fine.


I picked up a shirt for my little dude ($1 on clearance at the Walmart - so if I screwed it up I wouldn't feel too bad) and decided to make it in to a St. Paddy's shirt (there's my "green" tie in). First I printed out a clover graphic I found online and then traced it on to the freezer paper.

After cutting out the clover I ironed the stencil on to the shirt. Freezer paper has one side that is shiny/waxy and when you iron that is side that gets pressed against the fabric. Most of the tutorials I read recommended not using any steam while ironing the stencil on.


After the stencil is in position it's time for the painting. I placed a piece of cardboard inside the shirt before starting, just in case the paint bled through (which it did - the cardboard kept the back of the shirt paint free though). When you paint the edges start on the freezer paper and move your brush toward the center of the design - this helps prevent the paint from sneaking under the stencil.

I'm too impatient to do things like let the paint dry thoroughly so after two quick coats of paint I peeled off the freezer paper. One of the reasons I opted to use regular craft paint (rather than fabric specific paint) was because I wanted the shirt to have a weathered sort of vintage look after it was washed.

The above picture shows the shirt after it had been washed (I did let it sit overnight before washing to make sure the paint had completely dried). I don't feel like these pictures accurately capture the colors (probably because I was using a cell phone since I can't find my camera right now), but I am very happy with how it turned out.

(The above photo is a tad blurry thanks to a lack of cooperation on the part of my model.)

In addition to the shirt for my wee Irish lad, I used the same technique to stencil a tote I got at Hobby Lobby. This time rather than print the design and trace it, I cut a piece of the freezer paper to 8.5x11 and printed directly on to it. I wouldn't recommend this if you have a laser printer (the heat could cause the freezer paper to seal to your printer and that would not be pretty). It worked great with my inkjet though - just be sure you don't print on the waxy side of the paper.The rest of the process was the same. The letters were a little tricky. Some of the paint did bleed under the stencil and so the lines on the name weren't as crisp as I would have liked. I think if I had gone a little slower and used a smaller brush for that part it would have worked better (lesson learned for next time).

I used this tote in place of a gift bag for a party we went to this afternoon. The birthday boy's presents fit perfectly inside. So it's a different take on this month's theme - a reusable tote rather then a disposable gift bag. The tote was $2.99 which is about the same price as a store bought gift bag, but more "green".

Thursday, March 10, 2011

February Challenge, only a few days late....


Okay, so I actually DID make two things for the home in February, but then we went a traveling and then we got sick, and then I never did post them....

First off, I knit an afghan. I actually started it in December, so I'm not claiming it as my February craft challenge thingy. But, it's a whole afghan, which took quite some time, so I wanted to show it off.

The pattern was purchased at KnitPicks, and I've posted the details on Ravelry. I really loved that I could buy the pattern and the yarn on KnitPicks and the calculator helped me figure out how much yarn I needed for the project. Simple! There aren't any in-progress pictures of me knitting; just imagine me curled up under the blanket knitting away for hours at a time.

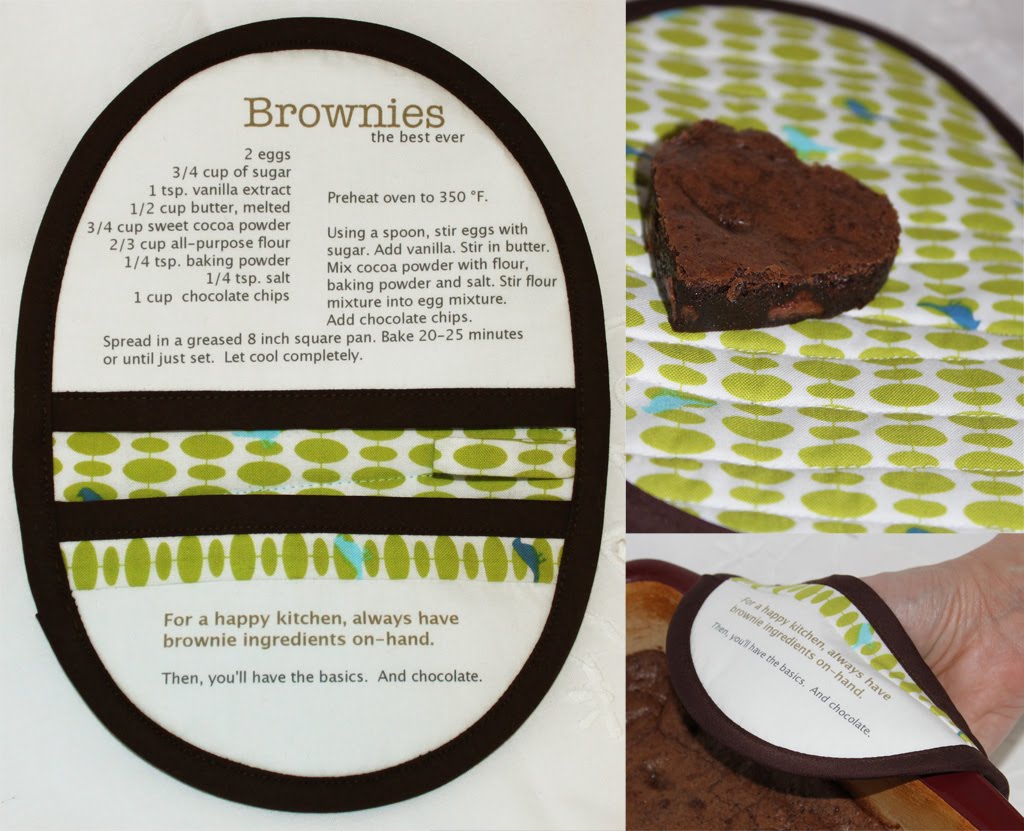
My second project, and the one that was partially inspired by this blog is a potholder. But not just any potholder, a recipe potholder.

I entered it into the PrudentBaby pretty potholder challenge, which sadly, I did not win. They were giving away a sewing machine and I REALLY wanted it. But, that's okay, I'm over it.....

I followed some of the tutorials listed on their site, but also used some printable fabric to print my recipe and a piece of advice right on the fabric.

I don't have any in-progress shots to share of this either. Stopping to take pictures just slows me down! I thought my potholder was pretty smart, and my advice? "For a happy kitchen, always have brownie ingredients on-hand. Then you'll have the basics. And chocolate."

Wednesday, March 9, 2011

Ok, so i am a procrastinator! lol

Ok, ladies I am a bit late, but I have been crafting. I have been wanting to use my sewing machine and I have been, but I haven't done anything green yet. I want some new material and I think I am going to make a hip green patterned nursing cover for my "green" project. I want something that will look good while out, and I found a cover that I would love to have that I am going to try and make! So that is to come, but for last month that I never got around to do/post, I have been trying to make a few different things. I tried some pants for my girl, but for some reason always made them too small, so I guess they are for the new baby who will be here in June. lol I am in the middle of making pillows too. I have some sewn but am going to screen print them with a nice print for the kids. I am doing some for the girls with butterfly's and then one with an airplane for David, then for the other boys I am going to do things that they like so they know its their pillow. New pillows are always nice to get! and The twins are getting to the age where they will start using a pillow on a regular basis,so i will get those in, too. But I did make a big playing pillow for the nursery floor. Which is what you see. I used everything that I had on hand but that we never used or really needed because we had so many! SO for this pillow I used baby blankets that we have SOO many of and sewed them together on my sewing machine, then I had a box of old clothes that could not be worn or that no one ever wore, and I cut those up and stuffed the pillow with that. It is all washable and it made a good stuffing for a big floor pillow. I want to also make one in blue for David too! Here is the one that I made so far so I figured its better late than never for February!  I was trying to flip the one picture but for some reason I cant. But it is a pretty big pillow and I think they will like playing on it in their room.

 View photo.JPG in slide showView photo.JPG in slide show

Tuesday, March 1, 2011

march challenge - green

[sketchbook photo by in and out of the studio]
posted by: jennifer

for my month i wanted to pick a color and the color usually associated with march is green.  other than being a fun color, green can be interpreted in a bunch of different ways...

green  noun  [1] a color intermediate in the spectrum between yellow and blue.  adjective  [2] environmentally sound or beneficial.  [3] untrained; inexperienced.

either craft something in the color green or think outside the box, but above all have fun!  use the medium or your choice and post your creations here.  happy crafting!