
I have wanted to try freezer paper stenciling for a while now and finally got around to it last night. There are a lot of different tutorials available on the internet. I read through a bunch prior to starting and took bits and pieces from several them.
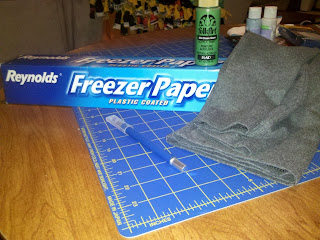 The main thing you need is freezer paper - this is not the same as press and seal (which I accidentally bought first) or wax paper. I found this roll at my grocery store. You also need paint. It seems like a lot of the tutorials recommend fabric paint. I used regular acrylic craft paint and it worked fine.

I picked up a shirt for my little dude ($1 on clearance at the Walmart - so if I screwed it up I wouldn't feel too bad) and decided to make it in to a St. Paddy's shirt (there's my "green" tie in). First I printed out a clover graphic I found online and then traced it on to the freezer paper.
After cutting out the clover I ironed the stencil on to the shirt. Freezer paper has one side that is shiny/waxy and when you iron that is side that gets pressed against the fabric. Most of the tutorials I read recommended not using any steam while ironing the stencil on.
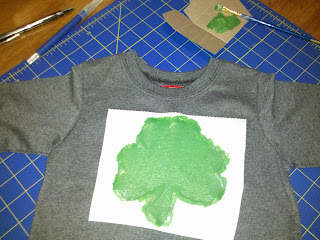
After the stencil is in position it's time for the painting. I placed a piece of cardboard inside the shirt before starting, just in case the paint bled through (which it did - the cardboard kept the back of the shirt paint free though). When you paint the edges start on the freezer paper and move your brush toward the center of the design - this helps prevent the paint from sneaking under the stencil.
 I'm too impatient to do things like let the paint dry thoroughly so after two quick coats of paint I peeled off the freezer paper. One of the reasons I opted to use regular craft paint (rather than fabric specific paint) was because I wanted the shirt to have a weathered sort of vintage look after it was washed.
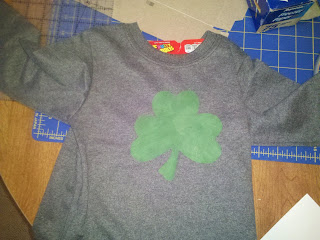
 The above picture shows the shirt after it had been washed (I did let it sit overnight before washing to make sure the paint had completely dried). I don't feel like these pictures accurately capture the colors (probably because I was using a cell phone since I can't find my camera right now), but I am very happy with how it turned out.
 The main thing you need is freezer paper - this is not the same as press and seal (which I accidentally bought first) or wax paper. I found this roll at my grocery store. You also need paint. It seems like a lot of the tutorials recommend fabric paint. I used regular acrylic craft paint and it worked fine.
I picked up a shirt for my little dude ($1 on clearance at the Walmart - so if I screwed it up I wouldn't feel too bad) and decided to make it in to a St. Paddy's shirt (there's my "green" tie in). First I printed out a clover graphic I found online and then traced it on to the freezer paper.
After cutting out the clover I ironed the stencil on to the shirt. Freezer paper has one side that is shiny/waxy and when you iron that is side that gets pressed against the fabric. Most of the tutorials I read recommended not using any steam while ironing the stencil on.

After the stencil is in position it's time for the painting. I placed a piece of cardboard inside the shirt before starting, just in case the paint bled through (which it did - the cardboard kept the back of the shirt paint free though). When you paint the edges start on the freezer paper and move your brush toward the center of the design - this helps prevent the paint from sneaking under the stencil.
 I'm too impatient to do things like let the paint dry thoroughly so after two quick coats of paint I peeled off the freezer paper. One of the reasons I opted to use regular craft paint (rather than fabric specific paint) was because I wanted the shirt to have a weathered sort of vintage look after it was washed.
 The above picture shows the shirt after it had been washed (I did let it sit overnight before washing to make sure the paint had completely dried). I don't feel like these pictures accurately capture the colors (probably because I was using a cell phone since I can't find my camera right now), but I am very happy with how it turned out.
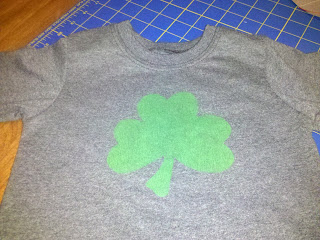
 (The above photo is a tad blurry thanks to a lack of cooperation on the part of my model.)
In addition to the shirt for my wee Irish lad, I used the same technique to stencil a tote I got at Hobby Lobby. This time rather than print the design and trace it, I cut a piece of the freezer paper to 8.5x11 and printed directly on to it. I wouldn't recommend this if you have a laser printer (the heat could cause the freezer paper to seal to your printer and that would not be pretty). It worked great with my inkjet though - just be sure you don't print on the waxy side of the paper.
 The rest of the process was the same. The letters were a little tricky. Some of the paint did bleed under the stencil and so the lines on the name weren't as crisp as I would have liked. I think if I had gone a little slower and used a smaller brush for that part it would have worked better (lesson learned for next time).
I used this tote in place of a gift bag for a party we went to this afternoon. The birthday boy's presents fit perfectly inside. So it's a different take on this month's theme - a reusable tote rather then a disposable gift bag. The tote was $2.99 which is about the same price as a store bought gift bag, but more "green".

Love it! How crafty of you!! I love the idea of a reusable bag as both a gift bag and wrapping paper. Also, your model is adorable, even if he is a little uncooperative!
ReplyDeletevery cute!
ReplyDeleteAWESOME!!!!
ReplyDeleteLove this! It looks so professional with such clean lines from the stencil!
ReplyDeleteI love this and want to try it! the bag is a great idea!
ReplyDeleteGreat project! I have a Cricut die cutting machine, and I bet you could cut designs out on that and then paint them. Will definitely be trying this, thanks!
ReplyDelete