Monday, February 28, 2011

dishtowels

posted by: Pooja

or, more accurately, "dishtowel", since I only got around to making one of them... anyways, I used this Patchwork Kitchen Towels tutorial.


Started off with plain Wal-Mart dishtowels.


The tutorial has the strips of fabric going vertically, but I liked the look of horizontal stripes better. I pieced together some leftover fabric from an apron I made, and ironed all the seams open.


Sewed the fabric onto the dishtowel and it was done! I didn't pin it before I sewed, so the fabric rectangle and the dishtowel didn't quite line up, but folding the towel hides that pretty well :)

Apparently March is National Craft Month, so happy crafting!

when i think of lorelei...

finished product... with just a little glare
posted by: jennifer

as soon as we found out we were having a girl two years ago, we knew we wanted to name here lorelei and we also knew that we wanted to frame the lyrics to the styx song [you can find the lyrics here] and put it in her room.  due to a little procrastination and almost two years later... i finally got around to it.


the materials: frame with mat, glue, glitter and my ibook
i used freehand to create the lorelei lyric print.  each word is its own separate object in order to adjust size, placement and spacing.
adding glitter to the mat... what little girl doesn't like sparkly things!
apparently adding glue and glitter to a mat makes it separate and curl... live and learn...
the finished print

I LOVE My Home but I am always late!


MyFamily and I moved into our home in September of 2009. I can honestly say we have hung3 pictures in the ENTIRE house since then. It was shameful but true. I am not much of a decorator, I'm cheap and "if it's functional its fine" migh as well be my personal moto! Funny thing is Im a crazy photographer so we have lots of great shots and lots of walls to hang them. What I lacked was motivation until Project Craftastic! I actually had bought frames at a garage sale like a year ago and stuffed them away ina closet because it began to overwhelm me! So I sucked it up and started the day after Erin invited me and it still took me this long!
So there it is: a huge wall and a huge mess! The under the stairs became part of the project after I did the rest because it looked awful! This is right where people enter our house so I've have had issues with it for some time... Its like the dumping ground and impossible to hide!

These are all the frames and I did a quick coat of spray paint to make them all the same color and clean them up a bit.

Below is a couple elements I wanted to add in for interest and had some super fabulous Ikea fabric left over! I love Ikea fabric! I covered a mat on one of the frames because it was stained. The cardboard W was more challenging then I expected and seriously took 2 hours... Oh brother! But Me and my friend Hot Glue worked it out eventually!

I actually had all of this ready to hang to catch the DEADLINE, but I needed my husbands help since the last time I tried to hang a curtain rod I busted a 3 inch hole in our freshly painted bedroom wall! Yikes! Plus I thought it would be a fun activity to do together (yeah right!!!) We actually only had a bit of a domestic on the original layout but once that was up we were both so excited about how nice it turned out. There is mostly pics of our gorgeous toddler throughout her 20 months, but I plan on adding more and more as we go! Lots of room!

Now I don't want you all to ask at once where I got that glorious chandelier... Can you believe it was here when we bought the house! We were really LUCKY! Hoping to fit that into one of these projects very soon! I have something up my sleeve and if it doesn't fit any of the categories , you better be ready for Let the Light in MAY!

Kitchen "Art"work


My kitchen walls have been bare since we moved into our home a year and a half ago. And to be honest I don't know if I have ever been brave enough to have something on big, empty kitchen walls. So I decided to suck it and try to make something for the poor, naked rectangular space above the dining table. The stars are leftover from February birthday craziness. The birthday fairy was brave enough to decorate the space even if it was temporary.
Here is my attempt. I chose colors that match the colors in the kitchen rug. I added gold paint to each color and the sponge painted the color on the canvas. Finally I took a putty knife and ran it across the canvas to remove excess paint. So while I am clearly not going to make a living painting, I have something for my kitchen. Now if only I can get the courage to put permanent holes in the wall...

Saturday, February 19, 2011

question for my crafting friends.

I am going to get going with my crafting. I have been trying to come up with stuff I would like to make, but I was wondering where the best place you have found to get a good amount of material for the cheapest. thanks ladies!

Wednesday, February 9, 2011

Wall Art for Florida House


Nana, 1940's

Nana, 1940's


Nana, 1940's

This is a project I've wanted to do for some time. My foxy Nana is my muse!
First, I took store-bought stretched canvas (AC Moore, on sale $5, 16X20) and painted it with the same latex paint that is on the walls of the bedrooms. Then, using my first silkscreen, I inked the background green image. Then, once dry, I took the second silkscreen & did the black ink overlay. I'm pleased with the pop-art quality of this. After all, if I'm going to have to have a hot babe in a bikini on my walls, it's going to be my late, great Polish grandmother!

I had the vellum for creating the silkscreen printed at Seneca Blueprint. I'll post my technique for creating the silkscreens in another post but a quick tutorial is available here from Peach Berserk, where I took the class & fell in love with the fashions many, many years ago.

Curtains for Florida house


Like Erin, I made curtains for our vacation home in Florida. I didn't go all out - I just measured the windows, added inches for the seam allowances & curtain rod height & got down to business. I used a simple seam marker/dressmaker guide to mark my pins, serged the edges, used a sewing machine for the seams (I am still an amateur serger & didn't want to experiment with the cover stitch for this project), added the grommets (Joann's) and voila! The Black & white (guest bedroom) & the flower (master bath) fabric came from Boca Bargoons, and the pink & green (guest room) was from Joann's. I had leftover fabric so I made some throw pillows, too, and used some of the extra in 12X12 frames to create a "visual triangle" of the pattern.

Tuesday, February 1, 2011

My First Curtains


Posted by: Erin

For the Home Sweet Home challenge I made curtains. My very first curtains. I've been told that curtains are so easy, and I found a pile of tutorials online. I ended up with this one at Design Sponge--Sewing 101: Curtains. Of course, the whole taking measurements thing was still completely baffling.

First of all, I had planned to make the curtains for the playroom. Took my measurements, added the inches according to the tutorial and went to the little neighborhood sewing shop for some advice on fabric. Of course, a great home decor fabric was on sale that would look terrible in the playroom but great in the office, so I called Pete at home to measure the office window. This (of course) took 10 times longer than expected because he figured I could convert feet to inches on the fly and then didn't take into account the addition of a curtain rod. Ugh.

Finally got the measurements and the nice sewing shop lady helped me figure out how long I needed to buy the fabric--you have to account for the long bottom hem plus shrinkage (and poor cutting skills if you're me). Then she asked me a thousand questions about how I wanted them to bunch up, etc. and that was hurting my head so I figured I'd just make the panels as wide as the fabric already was (54 inches) instead of having to cut more and make the panels wider. My window is 80", so 108" total, minus 5" hems and shrinkage and cutting should work out fine... We added 18" to the length (per the tutorial instructions, she said 12" would be fine next time, but I wanted extra just in case) and HOORAY! finally cut the fabric! Thankfully it was on sale ($10.99 a yard instead of $16.99!), because just the fabric was $30! She also talked me into a $14 hem guide.

You don't really need this picture, but I am excited, ok? Check out that new iron! I must be getting old if I am excited about a new iron, right?

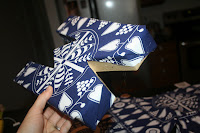
I measured what seemed like ten times (I have zero patience for measurement) and finally cut two equal panels!!!! The actual sewing was easy--hem both sides 1/2" then 1" (tutorial showed 1/2" but recommended 1"), bottom is hemmed 1/2" then 5", top 1/2" then 2" (I did 3" because the curtain rod was fat). For the hem, here is where the $14 "notion" kept me sane--check it out!


Granted, the company spells "EZY" like fools, but the tool really was worth the money! You can iron right on the thing and it has markings on both sides and you can use to help make a straight or curved hem! It was especially nice for working such a long hem...If you don't have one and are going to make curtains or something--get one. You'll be glad you did.

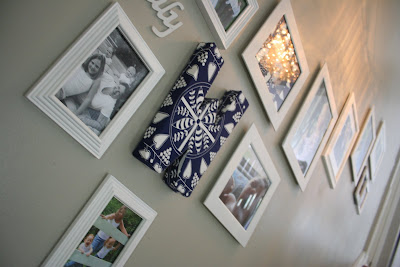
Anyway, I finished one panel and held it up to the window to make sure that it was going to fall correctly before starting the second panel. While I worked on the second panel, Pete stomped around, swearing at the drywall and installing the curtain rod.


Finished the second panel, hung it up, and surprise, surprise--the second panel is about an inch longer than the first. No idea how, but whatever, it was my first try! Thankfully, that is usually the spot where my little box of drawers, books, and pens sit, so when they are back in place you can't even tell!


I was amazed at how easy (minus all the measuring and cutting) making curtains actually was! This tutorial was also VERY easy to follow, with LARGE, clear pictures for the sewing novice. I'm not sure that making curtains is always more cost effective than buying them, but you have so many more options! I have big plans to make curtains with grommets at the top for the sliding door and tab-top ones for the playroom, and perhaps a valance for the kitchen. We'll see how they turn out, or if it takes another 10 months to make them...

February Challenge--For the Home Sweet Home

Posted by: Erin

I've been meaning to make curtains since we moved into our house in April 2010 (10 months ago, but who's counting) and this blog was the perfect excuse for me to FINALLY make something for our house! I tend to make things for other people so it will be nice to make something for us, too...

The February Challenge is to make something for the home--it's like making something for yourself but for everyone else in your home, too! And if you feel like making something for my home, I have lots of requests! ;) Use the medium of your choice and post your creations here. I hope to see lots of variety and get lots of new ideas!

Whatever you end up making, I hope you have fun! Happy Crafting!